How to Straighten Macrame Fringe and Keep it That Way
When the fringe on your projects doesn’t hang quite right or it curls up when you don’t want it to, there is a way to keep it nice and straight. Learn the best way to straighten macrame fringe and keep it that way.

Are you new to macrame? Check out 19 Macrame Terms for Beginners You Need to Know and Learn To Macrame With 4 Basic Knots. Get started with my Macrame Plant Hanger For Beginners or this Simple Macrame Wall Hanging with Feathers
The Best Way To Comb out Fringe on Your Macrame Project
I have tried different ways of combing out the fringe on my macrame projects. There is no easy way to do it, you just have to take your time and be thorough with whatever tool you use. Patience is a virtue when it comes to combing out fringe.
My projects don’t usually call for combing fringe completely out. I like to let it naturally fray on the ends when I do wall hangings and the tail of plant hangers. I also don’t normally use single twist cord which makes a beautifully combed out fringe when done right.
I’m definitely on team 3ply twisted because I like the structure it has and it holds together better. It also creates a fun wavy fringe when unraveled instead of combed like this tail on my color blocked plant hanger.

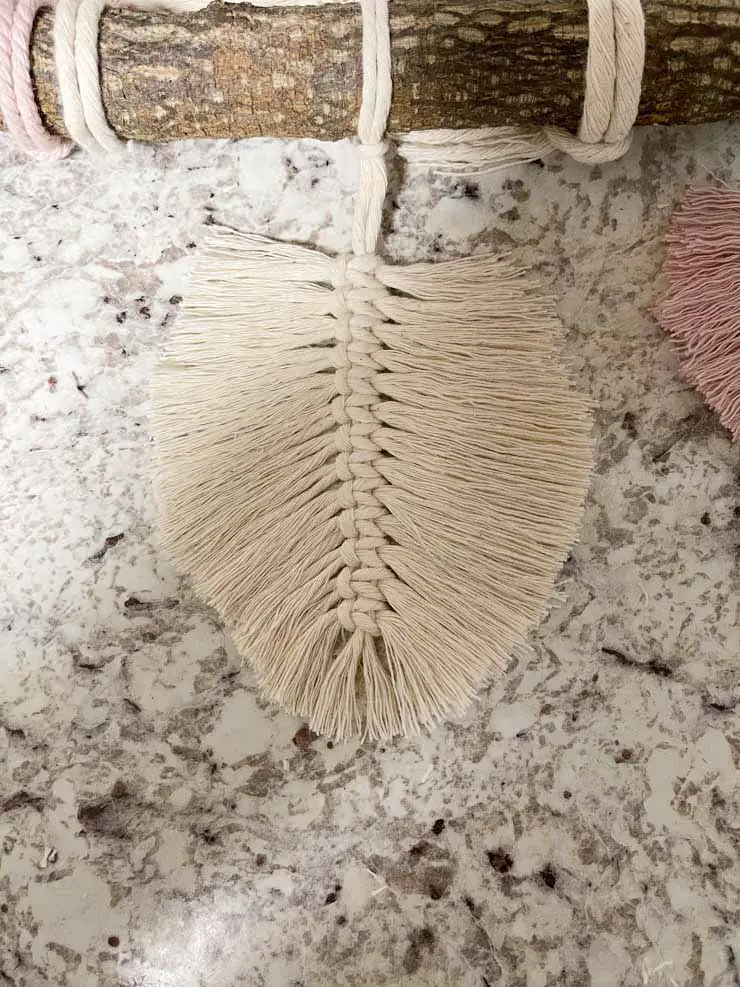
I recently did a feather wall hanging and of course that required combing out the fringe to make the feathers. I did it a couple of different ways.
Using a Comb to Straighten Macrame Fringe
I use a regular plastic comb. It’s one of the ones I have left over from the days when I did hair in a salon. It isn’t the quickest way to straighten macrame fringe, but it works. I have also heard people say they use a metal comb, either one will do the job.
I start at the very bottom and work my way up just like I would if I was combing tangles out of my granddaughter’s hair. Luckily the fringe doesn’t cry or pull away, LOL! I can easily comb two cords at a time with a comb.

Using a Pet Brush to Straighten Macrame Fringe
A pet brush is a quicker way to straighten macrame fringe. You still start at the bottom and work your way up, but you can brush more cords at a time with the pet brush.
Beware though, a pet brush will cause more lint to come off your fringe. I may or may not have been covered in it the first time I tried it…and in black yoga pants. It was as bad as white dog hair.
When choosing a pet brush, make sure the bristles are strong and spaced a decent amount of space apart from each other. I bought one at our local Meijer in the pet department and thought it was sturdy enough, but the bristles were to thin and too close together to do the job.
I went back to the brush we had and it worked great except for the excessive amount of fuzz it created.

How to Keep Macrame Fringe Straight
Once you worked hard to straighten macrame fringe you want it to stay that way. Nothing is more frustrating than to look at a piece a few days later to see the fringe starting to curl and separate.
A normal wall hanging can be finger combed to bring back the look of the fringe, but sometimes your piece may need a little extra help to keep it straight. Macrame feathers are a perfect example of when you will want to add a little extra effort to keep the fringe nice and straight.
Now with feathers, you could add backing. Felt or stiff fabric can be applied to the back with glue to keep them looking perfect. I did try that first and for me it didn’t turn out to my liking and it won’t work with the fringe on a normal wall hanging.
How to Use Spray Starch to Keep Your Fringe in Shape
Starch works on clothing, so why not on macrame fringe? I bought a can of spray starch and used it to on the feathers of my latest wall hanging. Before the starching the feathers were hanging uneven and the fringe was separating. They were just ugly, no doubt about it.

The starch is heavy and it will take awhile for your fringe to dry, but it is totally worth the wait.
Step 1. Comb feathers
You may have already cut them to the shape you want, so go ahead and comb them into the shape you want them to be.
Step 2. Spray on starch
Spray the starch liberally onto the feather. It should be good and wet to the touch

Step 3. Use a comb to shape fringe
The strands will curl and separate when wet so use a comb and comb them back into shape. Allow to dry for about 30 minutes

Step 4. Comb again until smooth.
Yes, comb the strands again. We want them to stay smooth and in shape.

Step 5. Trim any out of place strands
Take the time now to trim any out of place strands. I use a pair of hair cutting shears to do fine trimming. The blades are nice and sharp and the cotton strands don’t dull the shears.
Step 6. Allow to dry completely
I let mine dry over night to be sure it was good and dry before hanging.
Using Hairspray to Keep Macrame Fringe Straight
I didn’t buy any special hairspray to use, I used the Kenra hairspray that I had in my cabinet. A bit expensive to use on a macrame feather, but hey, you use what you have right?
The hairspray is a lot lighter than the starch and smells a lot better too. I sprayed the feather completely and combed it same way I did with the starch.
It didn’t get as wet, but still had the same effect as the starch. It also dried faster. Just to be sure I sprayed the feathers I used it on twice.
Step 1. Comb the feather
Comb out the fringe of the feather.

Step 2. Spray with hairspray
Spray liberally with hairspray. It won’t feel as wet as it does if you use starch.

Step 3. Comb fringe
It shouldn’t curl because the hairspray isn’t as wet as the starch, but comb it out if it does.
Step 4. Allow to dry
Allow to sit for 30 minutes to be sure it is dry.
Step 5. Trim
Trim any out of place strands and comb into final shape.
Should you apply heat?
You should definitely apply heat if you use starch. The feather that I allowed to dry over night was not as smooth as I wanted it to be. It held it’s shape, but didn’t have a very finished look to it.

The feather that I used heat on after applying starch and combing became a little flatter and smoother. It was also easier to trim.

I also used heat on the ones with hairspray with the same effect and as you can see it isn’t as wavy as it was prior to applying heat.

I used my clothes iron. You might be tempted to use it on the cotton setting. After all, the macrame cord is cotton. DO NOT use the cotton setting, it will be way too hot and the strings will melt to the iron. Ask me now I know this?
Set your iron on the lowest setting and if it isn’t hot enough increase it little by little until it gives the cord a smooth appearance. You can do this when it is wet or when it’s dry. I did it both ways with the same result.
The feather wall hanging looks so much better now and the feathers are keeping their shape. It is definitely worth the extra effort to straighten macrame fringe.


Pin how to straighten macrame fringe to Pinterest!


I am a beginner at this Macrame game.You are the first blog that has explained how to stop the cord from twisting. Now I have tried all sorts to stiffen the wings on my angel project. And am now resorting to very strong hair spray. After spraying I was expecting the fringe to be rigid but it isn’t am I expecting too much ?? or maybe using the wrong stuff.
Hi Carole! How many coats of hairspray have you used? It may take multiple coats of hairspray to get it as stiff as you want it to be. You could also try spraying, combing out then using a flatiron on a low heat setting to help set the hairspray. Just like we do when we curl or flatiron our hair. Just be sure the iron is on a low setting so it doesn’t burn or melt the string. Honestly, if you don’t want them to move at all I would suggest using a backing on the wings. Felt is what I have used, you simply spray adhesive on the felt, apply it to the back of the wings and then carefully comb the wings out. You can either trim the felt to shape before or after.
I hope that helps!
@Carole Lewnes, hi and another tip I found is to spray both sides with the hair spary and I used the extra hold one.
thank you for sharing that Judy!!
Thank you! This was the detail and explanation I was looking for to finish off my projects.
I’m so glad you found it helpful!